Booklet printing with LaTeX
2022-12-17T17:49:01
In another episode of "there was something very peculiar I wanted to do, there existed no decent guides on the internet, so here is mine": booklet printing. I had the need to turn a LaTeX document I had produced into something physical which could be taken with me easily. After a few days of research and experimentation and some wasted paper, I arrived at a very satisfying result. There is something about real-life printed books (even a small one) which cannot be translated to digital media. So here is how you can do the same for any PDF document you might have.
One learns many things in university. To the horror of my former teachers, if I had to elect the most useful and enduring skill I learned back then, one which I use extensively to this day… learning to use LaTeX effectively would be among the primary choices. From notes to presentations to books to the images in this very post, few tools are more essential to my daily routine.
While most of the time the desired output for a LaTeX document is a good old PDF file, I recently had the need and the inspiration to produce something physical. In this case, the most appropriate form was a booklet, or small book. That is, instead of the usual A4 single- or double-sided print, a series of A4 pages is printed in a specific format, folded in half, and bound together, producing a small book with pages of size A5.
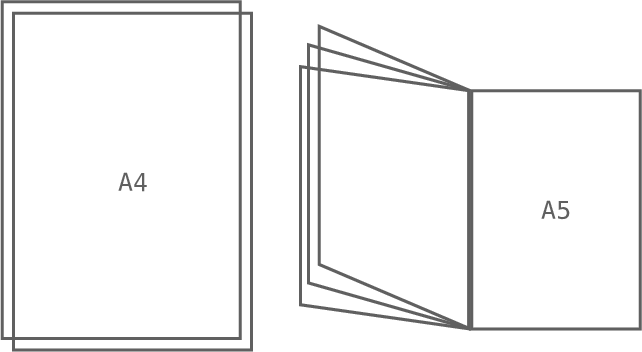
While that is a common option in printers and printing programs, it can also be done as a post-processing step of a regular PDF file. And although the process is not complex, I found it rather difficult to aggregate information about the several different programs, not to mention understanding the printing vocabulary, to arrive at the final result. So here is a summary and a guide.
LaTeX
This first part will start from the very beginning, creating a PDF file out of nothing. Feel free to advance to the next if you already have a document and just want to format and print it, but do keep in mind the dimensions of this format are not appropriate for some types of content, at least unchanged, as discussed below.
Other than the few options described in this section, the document itself can be composed however desired. Defining these options early, however, reduces the need to reformat the content later to adjust it to the reduced dimensions.
documentclass
Every LaTeX document starts with a documentclass declaration. It
defines the overall structure of the content and the sections that compose it.
Any class could potentially be used for a booklet, but
\documentclass{book} is the most appropriate since it has two-sided
pages, chapters and sections, etc.
Other than the name, another important part of the document class are the
options, which go inside [brackets] between
\documentclass and {book}. Relevant here are:
-
Paper size: choose whatever size is appropriate for your printer.
letterpaper(5in x 11in) is the default.a4paperwill produce the standard A4 size (210mm x 297mm). -
Font size: the default size of
10ptmay be too small depending on the type of booklet and the intended usage. Other available values are11ptand12pt. If these are still not sufficient, packageextsizesprovides\documentclass{extbook}, which adds several more options. For my particular case,14ptwas the best choice.It may be necessary to actually print a test page with a few lines in some of these font sizes to determine the best one, since the electronic version does not give a good idea of how text will look on real paper.
geometry
The book document class predefines very spacious margin sizes.
This is intended to produce lines with a reasonable number of characters (below
80, as God intended) to facilitate reading. With the reduced page size and a
larger font size, it will probably be necessary to adjust the margins. This can
be done with the
geometry package.
The final set of options I used was:
\usepackage[
    a4paper, heightrounded, includefoot, includemp, marginparwidth=0pt,
    top=1cm, bottom=1cm, outer=1cm, inner=2cm,
]{geometry}
This package is also useful for creating title pages (or any page with different margin sizes), e.g.:
\newgeometry{margin=0pt}
\begin{titlepage}
    % title page text/commands
\end{titlepage}
\restoregeometry
Printing vocabulary
A few printing terms need to be understood before the required operations to produce a booklet can be explained. Imagining a traditional book resting on a table with the cover facing up, with the traditional Cartesian axes being the table surface (XY) and the normal vector pointing up (Z):
-
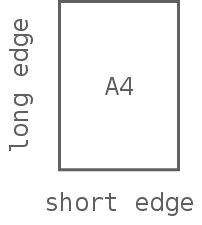
Long/short edges: these refer to the sides of the paper sheets. The binding of a book is usually on the long edge on the left (parallel to the Y axis).
-
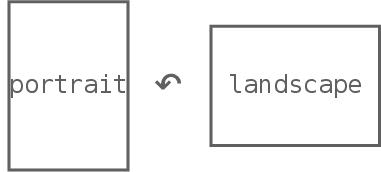
Portrait/landscape: books are usually printed in portrait mode, in which the long edges are parallel to the Y axis as explained above. Landscape mode is a 90° counter-clockwise rotation along the Z axis, such that the long edges become parallel to the X axis. For a book, this would turn the binding towards the reader.
-
One-/two-sided printing: whether pages are printed only on the front or on both sides of the paper sheet. For the latter case, reversing the sheet before printing the other page can be done either over the short or the long edge, depending on how the two sides of the sheet should be oriented in relation to each other.
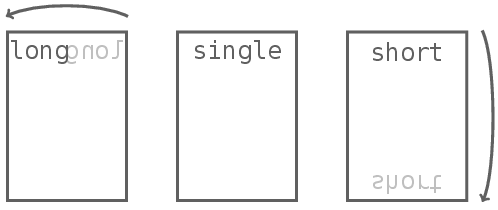
This can require (and will for the booklet format) mirroring the pages on one of the sides of the sheet so that they are properly aligned with the content on the other.
-
N-up: this is the process of sub-dividing an output page into n parts and placing one (resized) input page in each sub-division. 2-up means the output page is divided in half, each side containing one page from the input that is half its original size.
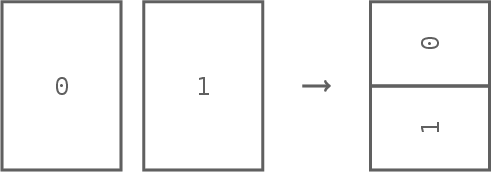
While there are two possible sub-divisions for 2-up printing (and many more for larger numbers), the one shown in the image above (where the division is done along the horizontal — i.e. X — axis) is the most common, since it preserves the aspect ratio of the pages.
-
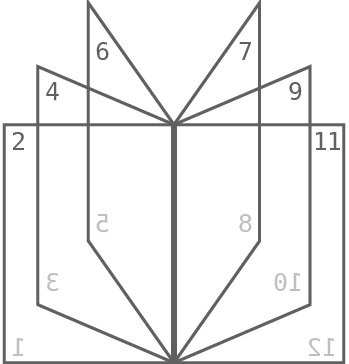
Signatures: if you look at the binding of a traditional book, you will notice it is not composed of a stack of individual sheets. Pages are instead grouped into what are called signatures: 2-up sheets in landscape orientation which are bound together at the fold. Each of these folded layers can be composed of a single folded sheet (four pages) or multiple sheets folded together. Here is an example of a twelve-page signature (composed of three sheets):
pdfjam
This is a script which uses LaTeX itself to manipulate PDF files. It can be
used to transform a normal document into a format that can be printed directly
as a booklet. pdfjam itself is usually distributed as part of
TeX Live, but the particular script
required for this task, pdfbook, is part of
pdfjam-extras.
Since it is just a shell script, if it is not installed it can be simply
downloaded and executed directly.
The first requirement is to know the number of pages in the document. Since
each sheet will contain four pages (think of a single-sheet signature), this
should ideally be a multiple of four. Blank pages will be inserted
automatically at the end if it is not. This is important since the two
inner-most pages — i.e. those at exactly half the page count — must
be printed on the same (inner) side of the sheet, as in the image above. The
following commands can be used to extract the number of pages from a file
(pdfinfo is from
poppler):
$ pdfinfo input.pdf | awk -F ':\\s*' '$1 == "Pages" { print $2 }'
28
This is the point where all the terminology discussed earlier is critical to
produce the correct result: in order to print the document and fold and bind it
as a booklet, pdfbook has to be instructed to produce a landscape,
2-up, single-signature version of the input which can be printed in two-sided,
long-edge mode (phew). Thankfully, the only configuration necessary in
this case is to tell it to produce a single signature containing all the pages:
$ pdfbook --signature 28 input.pdfA few things to keep in mind about this command:
-
Make sure to use the number of pages reported by
pdfinfo. -
Note that this may be different from the number seen in the last page of the
document, depending on how it is structured (e.g. if it has a
\frontmattersection). - Also note that the argument is the number of pages in each signature, not the number of signatures.
The command will produce a file called input-book.pdf in the
desired format. Opening it in a PDF viewer can be quite confusing, since the
orientation, rotation, and page ordering are very different from a normal
document, as expected.
CUPS
Printing on Unix systems is done using CUPS. Its basic mode of operation is simple:
$ lp -d printer input.pdf
This will print the file input.pdf using the printer named
printer.
To print the file generated by pdfbook in the correct format, the
following options are required:
-
-o orientation-requested=4: landscape orientation. -
-o sides=two-sided-long-edge: print on both sides of the page, reversing each page over the long edge.
The final command is:
$ lp -o orientation-requested=4 -o sides=two-sided-long-edge input-book.pdfBinding
Once the document is printed, it needs to be folded and bound. The pages should come out of the printer already in the correct order, but make sure they are by laying them on a table as if they were a book opened exactly in the middle. Go through each page, starting from the cover, and verify that they follow the correct sequence. Then, fold each A4 page in the middle (the first fold is done such that the title page ends on your left palm).
Binding can be done in a number of ways. The simplest is to use a stapler to bind twice at the fold. For A4 sheets, this requires a long stapler. It is also possible to manually perforate and fold the staples, but that gets difficult to do precisely as the number of pages increases. Take extra care that the staples are placed as close as possible to the fold, otherwise one half of the pages will turn irregularly.
If you followed all of this, you should now have a very nice-looking booklet. You can see the result of my first try here.